How to Add Testers to Google Play Console: Step-by-Step
Takes 3 minutes. No technical knowledge needed. This is exactly what you do after getting approved testers from TestForPay.
Before you start — make sure you have:
- A Google Play Console account with your app uploaded
- Your app assigned to a Closed Testing track (Alpha or custom)
- At least a few approved testers in your TestForPay job
Don't have testers yet? Post a job on TestForPay →
A note from Evans
The first time I set this up, I spent 20 minutes hunting for the opt-in link because I didn't realise you have to save the email list first. Google doesn't tell you that clearly anywhere. That's step 4 of this guide — read it before you wonder why the link isn't showing up.
— Evans, founder of TestForPay
The 6 steps
Open Your Closed Testing Track
Go to Google Play Console → Testing → Closed testing and click your testing track. It might be named "Alpha", "Closed Test", or whatever you named it when you set it up.
Once you're inside the track, you'll see three tabs at the top: Testers, Releases, and Countries / regions. Click the Testers tab.
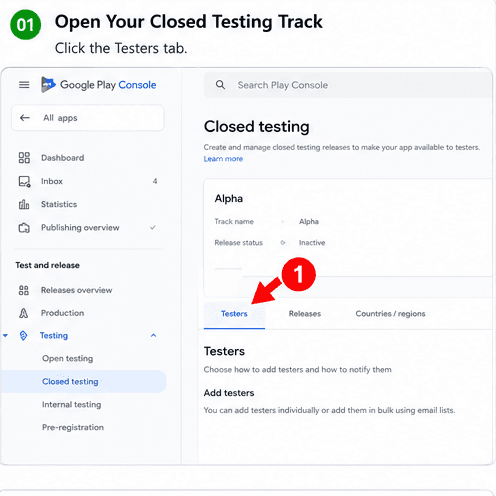
Screenshot: Closed testing track with Testers / Releases / Countries tabs
Create a Tester Email List
Inside the Testers tab, scroll down until you see the Email lists section. Click "Create email list" — the button is usually in the top right of that section.
Name it something descriptive like TestForPay Testers or your app name. The name is just for your own reference — Google doesn't use it for anything.
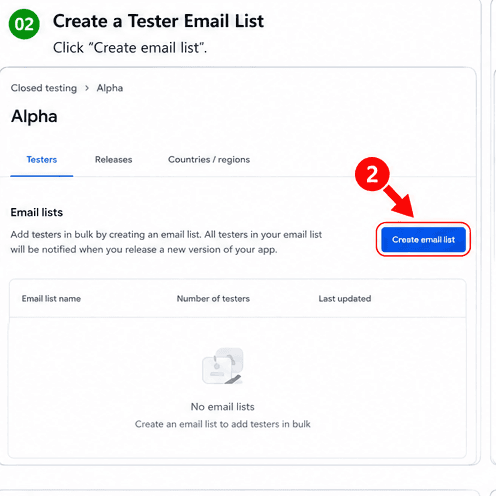
Screenshot: "Create email list" button in the Testers tab
Don't skip naming it. If you have multiple jobs in the future, generic names like "List 1" get confusing fast.
Copy Tester Emails from TestForPay
Go back to your TestForPay dashboard, open your job, and look for the Tester Emails card in the right sidebar. You'll see a list of all approved tester emails.
Click "Copy all emails". This copies every email as a newline-separated list — exactly the format Google expects.
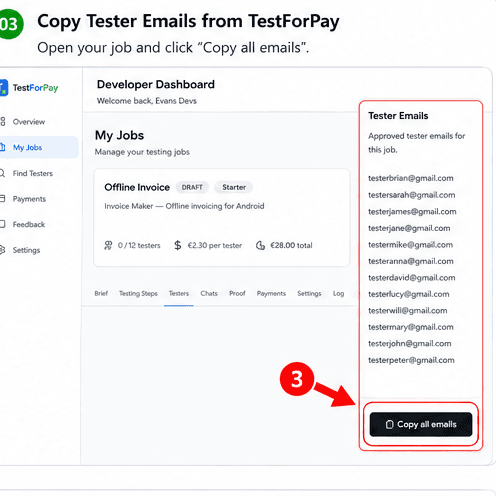
TestForPay: Tester Emails card with "Copy all emails" button
Go back to the Google Play Console email list and paste. Each email goes on its own line. Click Save.
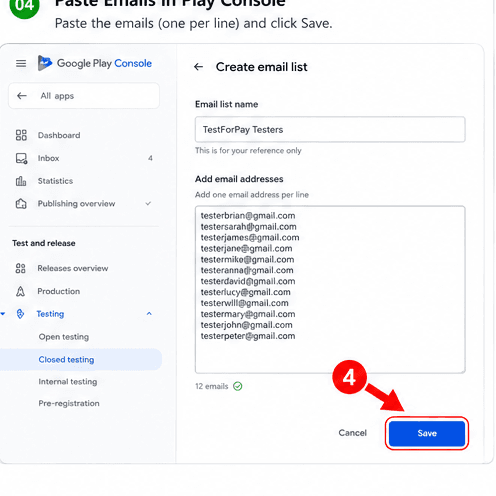
Screenshot: Pasting emails into the Play Console email list field
Get the Opt-In Link
After saving the email list, scroll back up to the top of the Testers tab. Google will now show you a URL that looks something like:
This is the opt-in link. Your testers use this to join the closed test. Copy it — you'll need it in the next step.
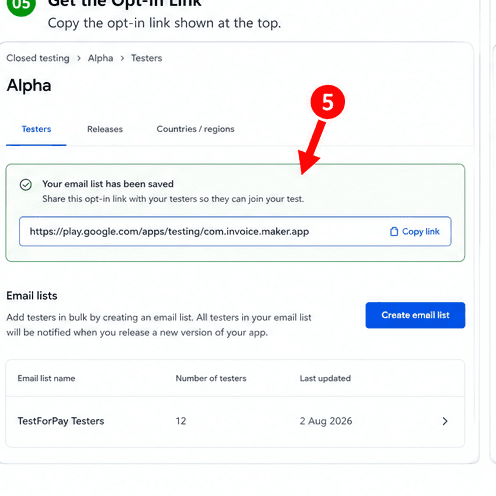
Screenshot: Opt-in URL shown at the top of the Testers tab after saving
Don't see the link? Make sure you actually saved the email list first. Google won't generate the opt-in URL until there's at least one email in the list.
Paste the Link Back into TestForPay
Go back to your TestForPay job dashboard. Find the "Google Play Link" field — it's in the right sidebar under Job Details. Paste the opt-in URL there and save.
Once you save it, TestForPay can share the link directly with your approved testers. They receive it, click it, and join your closed test. You don't have to message anyone manually.
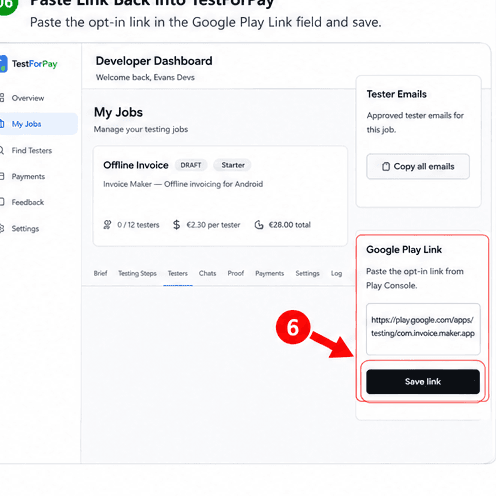
TestForPay: Job sidebar showing the Google Play Link field
Testers Join the Closed Test
Each tester will receive the opt-in link and follow these steps:
- 1Click the opt-in link
- 2Sign in with the exact Gmail address you added to Play Console
- 3Click "Become a tester"
- 4See the "Download on Google Play" button — they install from there, not from an APK
Once a tester clicks "Become a tester", they show up as opted-in in your Play Console. The 14-day clock starts when you have 12 or more opted in simultaneously.
What happens next
Once 12+ testers are opted in, the 14-day clock starts
You don't need to do anything to trigger it. Google counts automatically. Check your Play Console a day later — if you see 12+ opted in, you're on track.
Check your TestForPay dashboard daily for tester missions
Each tester has a daily mission to complete. This keeps them engaged and gives you proof of activity — useful if Google ever asks for it.
On day 14, apply for production
Go back to Play Console → Publishing overview and the 'Apply for production access' button should be unlocked. Click it and follow Google's form.
Want to earn money testing apps?
TestForPay pays real Android users to test apps for 14 days. Works on any Android phone.
Learn how to become a paid tester →Common problems
Was this guide helpful?
Not sure why Google requires 14 days?
Before adding testers, it helps to understand what you're trying to prove to Google — and the mistakes that reset your testing clock.
← Back to: What is the 12-tester rule?Ready to hire testers?
Get 12 verified Android testers in under 6 hours. We give you their emails, you paste them into Play Console, and the 14-day clock starts.
Still stuck?
Email testforpays@gmail.com with a screenshot and Evans will help.